Thursday, December 5, 2013

The Art and Play of Candy - The Recipe


After our family history and a bit about the process, here is the recipe and sources! We keep the house cool during the process (65F or less) so the chocolate can cool without streaks.

Turtles
2# small pecans (Trader Joe) 
2# small unsalted, unroasted cashews (Weavers Country Market, Fall Creek, WI)

Spread nuts on parchment paper-covered rimmed baking pans (I use six 12"x17" pans purchased from a restaurant supply store).

2# Wilbur milk chocolate (in blocks) (Weavers Country Market)
2# Wilbur dark chocolate (in blocks) (Weavers Country Market)

Caramel (from Pearl Vonyx, a neighbor from our childhood)
Mom's beat-up old 2 c. measuring cup
for the syrup. Gotta use it!

  • 3 1/2 sticks of salted butter
  • 2# light brown sugar
  • 2 cups Karo syrup
  • 1 can Eagle Brand sweetened condensed milk
  • dash (or more) salt - this is my secret - I go towards the more so my caramels aren't as much sweet as interesting!
  • 1 T. vanilla
Melt butter over medium heat. Add the rest of the ingredients. Stir constantly for about 45 minutes until the temperature reaches 247F. Let cool for a few minutes. Then drop small amounts of caramel on the nuts, using a spoon or candy funnel. Cool completely.

Chocolate
Cutting the chocolate blocks

Melting the chips
Hand dipping the chocolate onto the caramel pecans


Chop into small chips and place in small metal pan. Put the pan in a non-reactive skillet with 3/4"-1" of water held at just below simmer (keeps the chocolate at a temperature of between 110-112F). Add water when necessary. Stir chocolate until melted, pour onto a marble and temper (push back and forth over the surface of the marble) to 87F for milk and 89F for dark. Using spoon or hand, drop chocolate onto the cooled caramel-nut clusters. Cool and pack into boxes or tins, using wax paper or parchment paper between layers.


And that's how a batch of turtles gets done - an hour to make the caramel and get it on the nuts. An hour to cool. Two hours to chop, melt, temper and dip. An hour to cool. An hour to pack.  Then a chance to test the result and decide if these little beauties are good enough to give away (YES!!).

Each and every time I repeat this annual holiday ritual, my mom is close to me in thought and heart. I hear the echoes of the laughter, the chatter and the warmth of my sisters and aunts and cousins who worked at the prodigious task of making the candy. Each sweep of my hand and squeeze of chocolate brings back a sense of home and holiday. And I am so grateful for this beautiful skill my mom shared with me. Happy holidays!


Tuesday, December 3, 2013

The Art and Play of Candy - The Process


In the last post, I talked about how I got to be a candy maker.

Whenever I do something so infrequently, I worry that I will have lost the knack of it. But somehow, making turtle candy always comes back. My hand remembers. That and the sheets of brief notes that document the process and history of our candy journey. Mom learned long ago not to trust her memory, and daughter of my mother, I rely on these previously written jottings.

Candy making is an adventure. Each year something is introduced into the formula - a better way to melt the chocolate; a new source of nuts to buy; a "never-buy-that-brand-again" epiphany; an introduction of an instant read thermometer or a way to keep the sticky caramel from clinging to the pan (line them with parchment paper!).  The early notes from the eighties, written in my Mom's tiny handwriting - how many pounds and what kind of chocolate and nuts - include who came to make candy and how many days the candy was made. Notes on temperature, clues on sources for ingredients and even prices might show up in each yearly paragraph.

For us, candymaking is about tradition but also innovation and experimentation. How would those dipping chips work (not so well)? What if we first did a batch of caramels to wrap and then did the batch of caramels for turtles (oooh, that was a keeper in terms of kitchen efficiency and helper energy)? What is the perfect temperature to make sure the caramel isn't too sticky of too hard (I know!  Who could believe how many times that has changed!!)?

One such innovation? In the last post, I described how mom and helpers would use spoons to drop quarter size dollops of hot liquid caramel onto the nuts spread over the pans. This was quick and almost frantic work. Once the caramel was done, we had about fifteen minutes to work with it before it began to stiffen and harden. We had to wait a few minutes to begin because it was too hotly runny to set. So it was a race to get it onto the nuts in distinct small pools and not burn ourselves or have it harden too much to slide off the spoon.

A casual conversation one year about how Al poured the caramel at Seroogy's (through a big funnel with the flow controlled by a wooden stick) led us to our biggest innovation. That and a visit to the Vanilla Bean, a Madison candymaking and baking supply store which stocked this helpful tool. Pouring the caramel into this little white funnel with a ball-ended stick let us quickly - and safely - drop just the right amount of caramel on the nuts by quickly lifting the stick up and down to control the caramel flow. It was lightning fast.  From three or four people pouring the caramel, one can easily do it.  While a small detail, it took alot of the unpleasant labor from the day. Oooooh. Innovation!


Stirring the caramel
This year's fun was provided by our new instant read thermometer, an unexpected addition. I usually use two other methods - my old candy thermometer and our cooking timer/temperature probe. I use the stove time probe to get a general sense of the temp but have never trusted its accuracy in candymaking where a few degrees difference in temperature means a batch of candy lost. The candy thermometer was the final arbiter of caramel doneness.  I could rely on the probe to beep when we were near the right temp and use most of my 45 minute caramel-stirring time playing games, daydreaming or reading.

Tools of the temperature trade
But this year, my old dog candy thermometer lagged 8 degrees behind the probe and I knew I was in trouble. I grabbed the instant read, popped it in and got a close reading to the probe. Saved! I also used the instant read thermometer to see what temperature my tempered chocolate was. I never used a thermometer for this, just the feel of the chocolate and look of the drips. I was delighted to find the temper at a perfect 87F. Cool!

So, in the process, I get a chance to wrap myself in tradition and experiment like a mad scientist.  No wonder I look forward to candymaking each year.

In the next post, the recipe!

Sunday, December 1, 2013

The Art and Play of Candy - The Story


Holidays are not just times for friends and family together, but also a time of more baking and making from scratch. Somehow, these seasons of thanks and traditions call even the most die-hard processed food eater back to try a recipe remembered and treasured from childhood.

It is definitely the season for sweet treats from scratch. Cookies, cakes, candy and sugary delicacies that take extra effort and time are labored over and served or given as gifts with delight. Some people have a huge range of goodies they make.

I have just one, really. I make turtles - homemade caramel with hand-tempered and dipped chocolate over pecans or cashews - carrying on the tradition I learned from my mom.

Pull your chairs up to the fire, my friends, and let me tell you the tale of how someone who.does.not.like.sweets. became the torch-bearer for a family gastronomic tradition.

We did not always make turtles in my family. We made caramels, popcorn balls, fudge, peanut brittle and cookies of all sorts around the holidays.  But turtles didn't enter our lives until after one of the saddest days our family experienced.  My dad died unexpectedly at the age of 51 in September, 1971. Mom had been a homemaker and active volunteer, and coach, caregiver and general for us seven kids, three of whom were still at home when we lost Dad.

With no employable skills and mourning her sweetie, it was a tough few months. A family friend who owned a small candy shop asked Mom if she was up for helping during the busy holiday season. Mom was grateful for a chance to earn money for the family to supplement the life insurance and social security (dad worked at a factory so additional income was high priority to make ends meet). And so began our journey towards turtles.

Mom packed candy the first year she worked. The mad-house busy season for candy shops is October through Valentine's Day...sometimes extending to Easter. All hands on deck.

By the next year, the owners needed help hand tempering and dipping chocolate and so mom's apprenticeship began.  The Seroogy's tempered and dipped their chocolate the old-fashioned way - on marble, manipulating and smoothing the pool of chocolate back and forth by hand (muddy-gush!) over and over until it reached it's just right temperature to dip the candy in - too hot and the chocolate would be streaked with grey (the dreaded "charlie"); too cold and it "set up" in gnarly and ugly lumps, undippable.
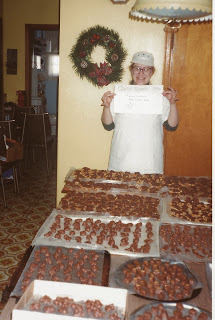
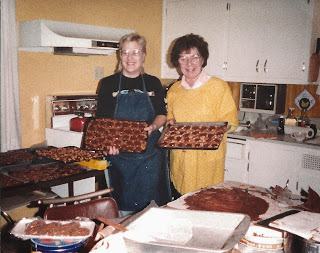
Candy at mom's house in the 80's

Making candy with  Auntie Lu in the mid-80s
Within a year or two, in addition to the candy we traditionally made at the holidays, hand-dipped nuts and turtles were introduced into our holiday sweets-making repertoire.  By that time we older siblings were out of the house - married and starting families, in college, in jobs.  Mom invited us back for candy-making days that turned into parties with an aunt or cousin sometimes joining my sisters and me. I was hooked.

We would make two batches of caramels and wrap those 300-400 chewy tidbits and make two batches of caramel to make the 800 or so turtles plus chocolate covered nuts. It was an all day job - starting at 8 or 9 am and continuing through the day until the last turtles were cool and boxed at 8pm. We ate soup at lunch and one of us would pick-up a carry-out from Kroll's, a local burger joint, for supper.
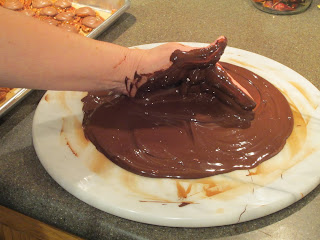
Tempering by hand
Mom did all the tempering and dipping. We kids spread the nuts on the pans, used spoons to pour a quarter-size dollop of hot caramel onto the nuts and kept the double boiler full of melting chocolate so mom didn't have to pause in her dipping - we would just add more melted chocolate to her marble, while she held up one chocolate covered hand and announced with a laugh and a twinkle in her eye, "Nickle a lick!".

Her time at Seroogy's brought her to master level at tempering and dipping. Just by the feel of the chocolate cooling from hot to perfect, and the look of it dripping off her hand in thin strings told her when the velvety ooze was at the perfect dipping temperature.  She invited us all to try our hands but the temper and the delicate twists and manipulations eluded us apprentices and our efforts produced interesting shapes that tasted great but were not easy on the eye.

As the years went on and lives got busier, all my sisters couldn't make the candy-making day and our numbers dwindled.  Mom was getting older and we downsized batches to make the day more reasonable.  I began to temper and dip under mom's tutelage (I think I never missed a candy-making year so mom thought it was about time!).  With her encouragement, I went from apprentice to journeywoman over the thirty years we made chocolate.  In the last few years of her life, slowed by Parkinson's, my mom gave me the reins for all the dipping and I became the master under her careful eye.

And so my own candy journey began. In the next part, we'll leave the story and get down to the brass tacks of the process and recipe for turtle making!

Sunday, November 10, 2013

Making Beef Broth

I make foundational beef or chicken broths about 3-4 times a year.  When I do, they last us for many months of cooking and recipes.

Fall and winter is the big broth making season for us because our soup and stew making increases by leaps and bounds in the dark, cold, hibernating seasons. To make the broth for these, all we need is a day when we will be hanging around the house - puttering, reading, doing the laundry, blogging or staying close.

Preparation is easy and results in a deeply rich flavored beef broth. The organic ingredients (since we are extracting the essence of all these, we don't want pesticide or hormone-laden stuff) don't need to be prepared in a fussy way. Carrots go in washed with ends nipped off. Celery, we cut in half to make sure it gets immersed. Onions go in peeled and whole. The long slow cooking time will reduce these veggies down.

The most active part of the recipe is roasting the beef bones before I begin. I learned this trick from the cookbook "Caprial's Bistro Style of Cuisine." Set the oven at 450F. Put the bones on a lipped tray with an unpeeled garlic or two and roast in the oven for an hour.  Put the bones in the soup pot, squish the garlic into the pot and then the fun part. Deglaze the roasting pan with a little red wine and scrape up all the little tasty, roasted bits and add to the soup pot.

Add water to cover and simmer 6-8 hours. Strain the broth through a cheese cloth (toss out the cooked out veggies - they've done their job flavoring and enriching the broth). Refrigerate (or put outside) until cool. Skim off the fat, put into 1 or 2 cup containers and freeze. Pop the big cubes out the next day into a freezer bag and voila - heart and soul warming broth that YOU made, ready for every recipe!

Sunday, October 20, 2013

The Big Apple


October is always apple crisp making time for us. Although I aspire to be a pie maker, I must admit that is it the quick crisp that draws my knife and time.

My favorite apple variety to use is an old beauty called the Wolf River. You can't much find it in the western part of Wisconsin where we live, but head east along the Wolf River where it originated and still grows, and the apple is readily found at farm markets and a few orchards.

My mom used it on occasion and she said my Grandma Loch did too. We all three liked it for it's fine tartiness in baking. But I suspect we also love it because you don't need to peel many to make that pie or crisp. These babies are huge, running from a half pound up to a pound each. Just three will fill an apple crisp pan and one can fill a pie! Since peeling is my least favorite part of the process, I make sure to get over to my old stomping grounds on the east side of Wisconsin in October to pick up a bag for baking.

For my recipe, I go to an old Betty Crocker cookbook and use this for the topping:
  • 1/2 cup all purpose flour
  • 1/2 cup rolled oats
  • 2/3 cup brown sugar
  • 5 1/3 Tablespoons butter
  • 1/4 teaspoon of cinnamon.
I mix that up by hand and sprinkle about half over the cut apples in a greased 8x8x2 pan and pop it into a 375F oven for 15 minutes.  I take it out and sprinkle the remaining topping on* and bake for 15 more minutes or until the apples get melty good.

A little ice cream on it while it's still warm and our perfect fall dessert or snack is ready to go!

*I learned this little half-and-half topping trick from the June/July 2002 issue of Fine Cooking Magazine. It keeps the topping from getting dark before your apples are done the way you want!

Saturday, July 13, 2013

Garlic and Me


It was a tool catalog that taught me how and when to plant and harvest garlic. Lee Valley, a mail-order company based in Canada, was a go-to catalog for my wood-working wonder of a partner. Years ago, while touting some gardening wonder implement or another, the company included a half page on garlic growing.  I can do this!!

Garlic is the last thing I plant each season. I start thinking about planting around the fall equinox.  I look over the garden and plan next year in my mind's eye and then decide what small space (about three yards square) I will choose to bed the garlic in over the winter.  I have until frost to get them in so I am leisurely about this.

I have saved back a few robust garlic heads from my July harvest. I have also pestered the garlic seller at farmer's market to share his favorites for me to try. And then in a whirl of activity, I break the heads into individual cloves, push them about an inch deep and 2-3" apart and ten minutes later, my year's worth of garlic is planted.  I put a thick mulch about 12" deep on top of them and mark the area.

The garlic sleeps the winter away.

By the spring equinox, the shoots are up; by summer solstice the scapes are ready and by July the stalks are brown and sere and my garlic is ready to come out of the ground.  A quick tug, a rub to get off the clinging dirt, a gentle braid of three heads with a loop at the top and they are ready to dry.

Our old rake handle (seems appropriate given where I learned to grow garlic) will hold the harvest under a protected roof to dry for a few weeks. Then I'll cut off the stems and put them in the pantry. I dream of meals ahead.....

Monday, June 24, 2013

No Escaping Scapes

We've been growing garlic for quite a few years now. We break apart the garlic into cloves and bury it closely together about an inch deep in fall.

It's a favorite because it's a winter sleeper - it goes into the ground in October with a nice foot-thick mulch and we forget about it until it's leaves poke up. We always enjoy a little mild spring garlic in April and May when our stored garlic from the previous season's harvest has given it's last gasp.  But we like to wait for most of the crop to mature.

In June (usually right around the solstice) on it's way to maturity, the garlic puts out it's flower.  The lovely "scape" curls around with a hooded flower at it's end. If we left the scape on the plant, it would draw power from the growing garlic. Gardeners just snip off this scape to keep the energy directed to the growing garlic bulb.

But oh those scapes!  They can be refrigerated and then added to foods just like a clove of garlic.   Although we use a few like that, we go crazy for garlic scape pesto. We make it and freeze it for cold winter meals where, combined with pasta and veggies, it brings a warm remembrance of solstice and summer when we looked for it's distinctive curl.

The recipe below was shared by Cate and Mat, our CSA from Ridgeland Harvest*

Garlic Scape and Almond Pesto
  • 10 garlic scapes, finely chopped
  • 1/2-1/2 c. finely grated parmesan (or to texture/taste)
  • 1/3 cup slivered almonds (toasted lightly if you'd like)
  • 1/2 c. olive oil
  • sea salt

Put about 1/3 of the scapes and almonds in a blender or food processor with some of the olive oil and mix. Continue to add these until these three ingredients are blended. Scoop into a bowl and add the sea salt and cheese.

If you don't use it immediately, press a piece of plastic against the surface to keep it from oxidizing. It can be stored for a couple of days or frozen for a couple of months (though we've been known to discover a tasty frozen chunk the next spring!)

*This year we got the sad news that their garlic crop hadn't made it.  Difficulty in obtaining the winter mulch and an over-wet spring has taken it's toll. We know how much their garlic harvest means to the farm's livelihood.  So we thank them for their efforts when the weather brings drought one year and too-frequent and too-heavy rains the next.